Introduction
In this tutorial, we will be building a flask app that scrapes cocktail ingredients. Here we will be getting ingredients data from a cocktail API here. For this tutorial, we will be using Flask as our basic web server and requests to make HTTP requests.
Table of Contents
Install modules
To install the above modules run the commands below on your terminal.
pip3 install Flask
pip3 install requests
Create files
Now let’s first begin by first creating a folder called flask-cocktail inside create a folder called templates and inside it create a file called index.html. Inside the flask-cocktail folder create a file called app.py.
Import modules
Open the app.py file we created earlier and import these modules as shown below.
from flask import Flask, request, render_template
import requests
Initialize
Now we need to initialize our application as shown below.
app = Flask(__name__)Create view
Now we need to create our view. Here we will be using an API from RapidAPI link is here . Subscribe to the API and make sure to keep the API key private.
@app.route('/',methods=['GET','POST'])
def index():
    if request.method == "POST":
        cocktail = request.form['name']
        url = "https://cocktail-by-api-ninjas.p.rapidapi.com/v1/cocktail"

        querystring = {"name": cocktail}

        headers = {
            "X-RapidAPI-Key": "YOUR API KEY",
            "X-RapidAPI-Host": "cocktail-by-api-ninjas.p.rapidapi.com"
        }

        response = requests.request("GET", url, headers=headers, params=querystring).json()
        if response:
            for data in response:
                ingredients = data['ingredients']
                instructions = data['instructions']
                name = data['name']

                return render_template("index.html",ingredients=ingredients,
                                            instructions=instructions,
                                            name=name)

    return render_template("index.html")

if __name__ == "__main__":
    app.run(debug=True)
The above takes a cocktail name and then gets the ingredients from the API and then renders the results to an html template.
Create template
Now let’s create a template to render the web app. Inside the index.html file we created earlier insert the code below.
<!DOCTYPE html>
<html>
  <head>
    <title>Cocktail Recipe Finder</title>
    <style>
      body {
        background-color: whitesmoke;
      }
      .title {
        text-align: center;
      }
      .container {
        display: flex;
        flex-direction: row;
        justify-content: center;
        align-items: center;
        height: 100vh;
      }
      .form-container {
        background-color: white;
        padding: 20px;
        border-radius: 10px;
        box-shadow: 0 0 20px rgba(0, 0, 0, 0.1);
        margin-right: 20px;
      }
      .result-container {
        background-color: white;
        padding: 20px;
        border-radius: 10px;
        box-shadow: 0 0 20px rgba(0, 0, 0, 0.1);
        animation-name: slide-in;
        animation-duration: 1s;
        animation-timing-function: ease-out;
      }
      @keyframes slide-in {
        from {
          opacity: 0;
          transform: translateX(50%);
        }
        to {
          opacity: 1;
          transform: translateX(0);
        }
      }
    </style>
  </head>
  <body>
    <div class="title">
        <h2>Cocktail Database</h2>
    </div>
    <div class="container">
      <div class="form-container">
        <form method="POST">
          <label for="name">Cocktail Name:</label>
          <input type="text" name="name" id="name" required>
          <button type="submit">Search</button>
        </form>
      </div>
      {% if name %}
        <div class="result-container">
          <h2>{{ name }}</h2>
          <h3>Ingredients:</h3>
          <ul>
            {% for ingredient in ingredients %}
              <li>{{ ingredient }}</li>
            {% endfor %}
          </ul>
          <h3>Instructions:</h3>
          <p>{{ instructions }}</p>
        </div>
      {% endif %}
    </div>
  </body>
</html>
Run
Open your terminal and run the command below.
python3 app.pyResults
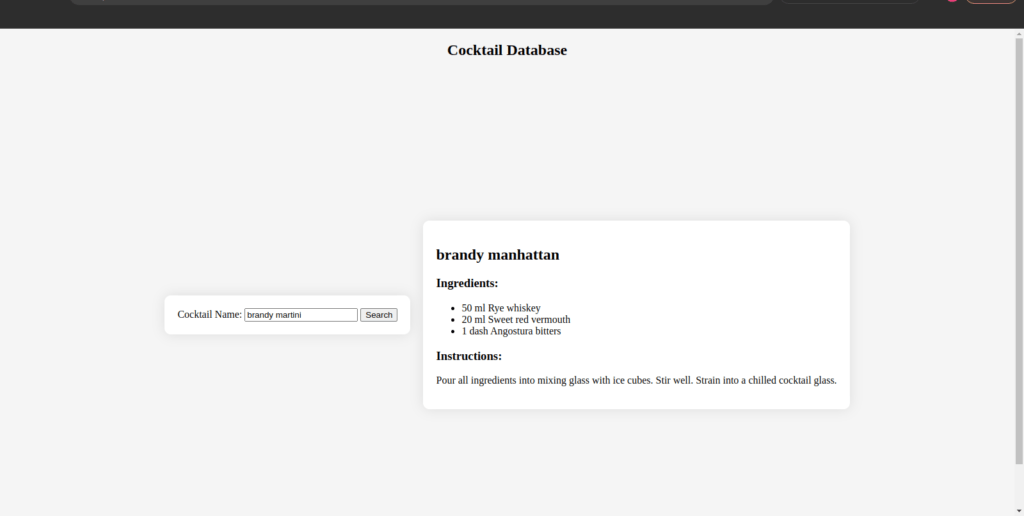
After running the above command open your browser at the address [ http://127.0.0.1:5000 ] and your application should appear as shown below.

There you have it, Thanks for reading. Happy Coding.


