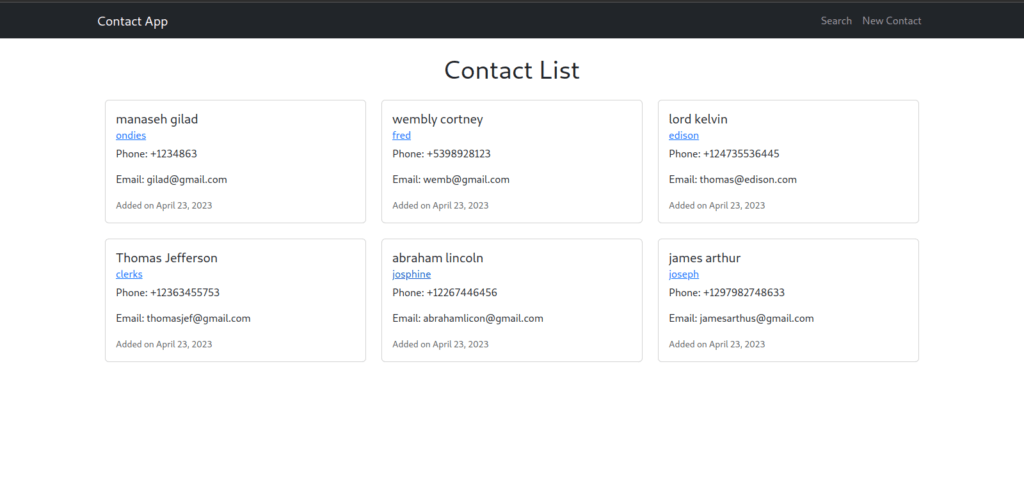
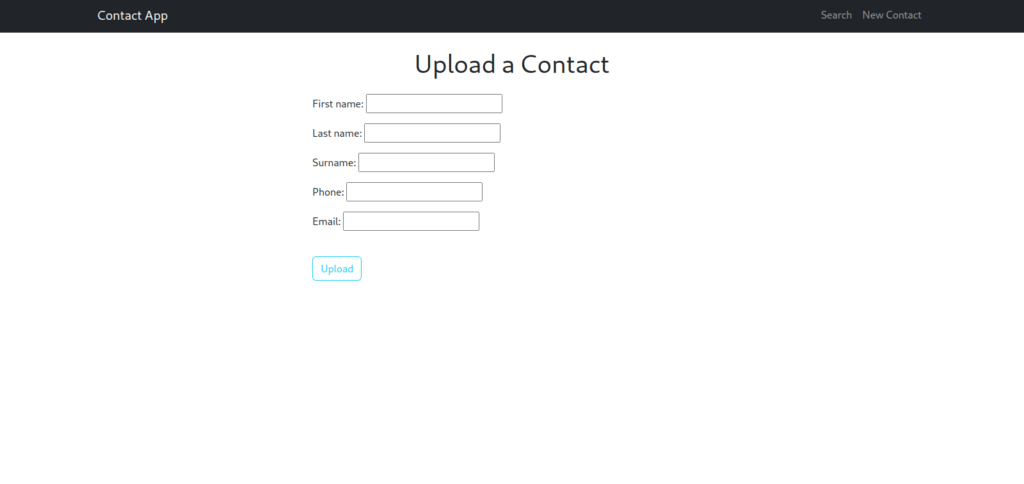
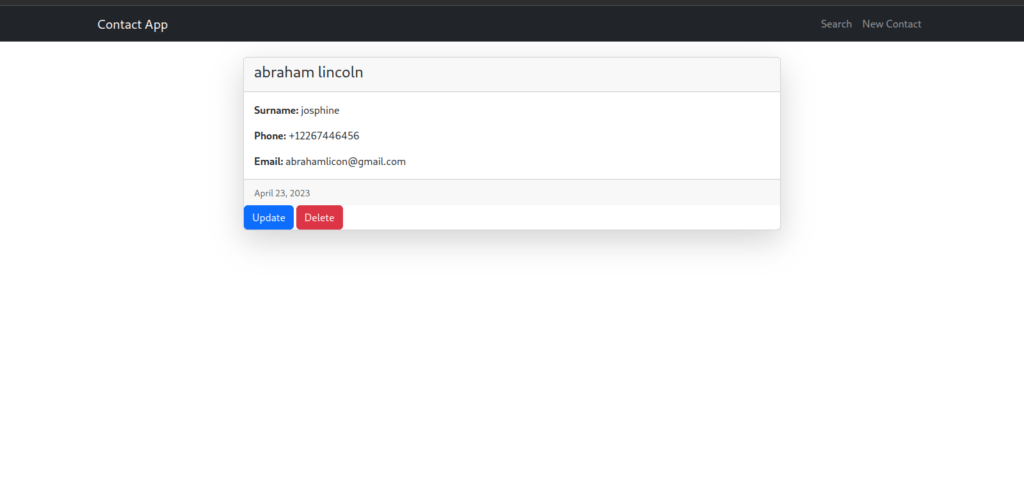
In this tutorial, we will be building a contact app you can store and retrieve contacts using the Django web framework. Here are a few screenshots of the complete app.


To begin we first need to install Django, to do this we will run the command below on your terminal.
pip3 install djangoAfter installing Django now let’s start our Django project, to do this run the command below.
django-admin startproject django_contactThe above command creates a folder called django_contact with some Django boilerplate files and code. Cd into the folder and run the command below.
python3 manage.py startapp contactNow we need to register our app to our django_contact project, to do this add the following code in the settings.py file.
INSTALLED_APPS = [
    'django.contrib.admin',
    'django.contrib.auth',
    'django.contrib.contenttypes',
    'django.contrib.sessions',
    'django.contrib.messages',
    'django.contrib.staticfiles',
    'contact',
]
Next, we need to add routes to our project, to do this add the following code below in the urls.py file in the django_contact folder.
from django.contrib import admin
from django.urls import path, include

urlpatterns = [
    path('admin/', admin.site.urls),
    path('',include('contact.urls')),
]
Create models for the contact app
Our contact app needs a database to store the contacts, to do this add the code below in the models.py file in the contact folder.
from django.db import models
from django.utils import timezone


class Contact(models.Model):
    first_name = models.CharField(max_length=20)
    last_name = models.CharField(max_length=20)
    surname = models.CharField(max_length=20)
    phone = models.CharField(max_length=30)
    email = models.CharField(max_length=30)
    upload_date = models.DateTimeField(default=timezone.now)
Next, we need to create a form for our application which we will use to ask for contact details. To create this form create a file called forms.py in the contact folder. Inside the forms.py file add the code below.
from django import forms
from . models import Contact

class ContactUploadForm(forms.ModelForm):

    class Meta:
        model = Contact
        fields = ["first_name","last_name", "surname","phone","email"]
Create views
Now let’s create views for our application first let’s import some modules into our views.py file as shown below.
from django.shortcuts import render
from django.shortcuts import render, redirect,get_object_or_404
from django.views.generic import DetailView, DeleteView, UpdateView, ListView, CreateView
from . models import Contact
from . forms import ContactUploadForm
Let’s create a view to upload our contacts, add the following code below.
class ContactCreateView(CreateView):
    model = Contact
    success_url = "/"
    template_name = 'contact/contact_create.html'
    fields = ["first_name","last_name", "surname","phone","email"]
Next, let’s create a view to display all the uploaded contacts.
class ContactCreateView(CreateView):
    model = Contact
    success_url = "/"
    template_name = 'contact/contact_create.html'
    fields = ["first_name","last_name", "surname","phone","email"]
Next, let’s create a view to search through the database.
def search(request):
    if request.method == "POST":
        query = request.POST.get('surname', None)
        if query:
            results = Video.objects.filter(title__contains=query)
            return render(request, 'contact/search.html',{'contacts':results})

    return render(request, 'contact/search.html')
Next, we need to be able to update contacts, here is the code for that.
def contact_update(request, pk):
    obj = get_object_or_404(Contact, pk=pk)
    form = ContactUploadForm(request.POST or None, instance=obj)
    if form.is_valid():
        form.save()
        return redirect('/')
    context = {
        'form':form
    }
    return render(request, 'contact/contact_update.html',context)
Next, is the delete view to handle all the delete functionalities.
class ContactDeleteView(DeleteView):
    template_name = "contact/contact_delete.html"
    success_url = "/"
    model = Contact
Finally, we need to create a view to see our contacts n detail, here is the code below.
class ContactDetailView(DetailView):
    template_name = "contact/contact_detail.html"
    model = Contact
Create contact routes
Next, we need to create routes for our contact app. In the contact folder create a file called urls.py and add the following code below.
from django.urls import path
from . import views
from . views import (
    ContactCreateView,
    contact_update,
    ContactDeleteView,
    ContactListView,
    ContactDetailView,
)
urlpatterns = [
    path('',ContactListView.as_view(),name="contact-list"),
    path('search',views.search,name="search"),
    path('create',ContactCreateView.as_view(),name="contact-create"),
    path('contact_detail/<int:pk>/',ContactDetailView.as_view(),name="contact-detail"),
    path('update/<int:pk>/',views.contact_update, name="contact-update"),
    path('delete/<int:pk>/',ContactDeleteView.as_view(), name="contact-delete"),
]
Create templates
Now we need to create templates to render our contact application. First, we need to create a folder inside the contact called templates and create a folder called contact, and inside the folder create a file called base.html. [contact/templates/contact/base.html]
The base.html template will be the main template which all the templates in the application will inherit from. Here is the code for the templates.
{% load static %}
<!DOCTYPE html>
<html lang="en">
<head>
    <meta charset="UTF-8">
    <meta http-equiv="X-UA-Compatible" content="IE=edge">
    <meta name="viewport" content="width=device-width, initial-scale=1.0">
    <title>Document</title>
    <link href="https://cdn.jsdelivr.net/npm/bootstrap@5.3.0-alpha3/dist/css/bootstrap.min.css" rel="stylesheet" integrity="sha384-KK94CHFLLe+nY2dmCWGMq91rCGa5gtU4mk92HdvYe+M/SXH301p5ILy+dN9+nJOZ" crossorigin="anonymous">
</head>
<body>
    <nav class="navbar navbar-expand-lg navbar-dark bg-dark">
        <div class="container">
          <a class="navbar-brand" href="{% url 'contact-list' %}">Contact App</a>
          <button class="navbar-toggler" type="button" data-toggle="collapse" data-target="#navbarResponsive" aria-controls="navbarResponsive" aria-expanded="false" aria-label="Toggle navigation">
            <span class="navbar-toggler-icon"></span>
          </button>
          <div class="navbar-nav">

            <div class="nav-item ml-auto">
                <a class="nav-item nav-link" href="{% url 'search'%}">Search</a>
            </div>
            <div class="nav-item">
                <a class="nav-item nav-link" href="{% url 'contact-create' %}">New Contact</a>
            </div>

          </div>
        </div>
      </nav>


     <div class="container" id="app">
        {% block content %}
        {% endblock %}
    </div>
    <script src="{% static 'js/jquery.min.js' %}"></script>
    <script src="https://cdn.jsdelivr.net/npm/bootstrap@5.3.0-alpha3/dist/js/bootstrap.bundle.min.js" integrity="sha384-ENjdO4Dr2bkBIFxQpeoTz1HIcje39Wm4jDKdf19U8gI4ddQ3GYNS7NTKfAdVQSZe" crossorigin="anonymous"></script>
</body>
</html>
Next, we need to create a template where users will upload their contact details. Inside the contact folder create a file called contact_create.html and add the code below.
{% extends 'contact/base.html' %}

{% block content %}
</br>
<div class="container">
  <div class="row justify-content-center">
    <div class="col-md-6">
      <form method="POST" enctype="multipart/form-data">
        {% csrf_token %}
        <h1 class="text-center mb-4">Upload a Contact</h1>
        {{ form.as_p }}
        <button class="btn btn-outline-info btn-block mt-4" type="submit">Upload</button>
      </form>
    </div>
  </div>
</div>
{% endblock content %}
Next, let’s create a template to render all the contacts in the database. Create a file called contact_list.html and add the code below.
{% extends 'contact/base.html' %}

{% block content %}
<div class="container mt-4">
  <h1 class="text-center mb-4">Contact List</h1>
  <div class="row">
    {% for contact in contacts %}
    <div class="col-md-6 col-lg-4">
      <div class="card mb-4">
        <div class="card-body">
          <h5 class="card-title">{{ contact.first_name }} {{ contact.last_name }}</h5>
          <h6 class="card-subtitle mb-2 text-muted"><a href="{% url 'contact-detail' contact.id %}">{{ contact.surname }}</a></h6>
          <p class="card-text">Phone: {{ contact.phone }}</p>
          <p class="card-text">Email: {{ contact.email }}</p>
          <p class="card-text"><small class="text-muted">Added on {{ contact.upload_date|date:"F d, Y" }}</small></p>
        </div>
      </div>
    </div>
    {% endfor %}
  </div>
</div>
{% endblock content %}
Next, let’s create a template to search through the database. Create a file called search.html and add the code below.
{% extends 'contact/base.html'%}
{% block content %}
    <div >
        <h1>Search </h1>
    </div>
    <div>
        <form method="POST">
            {% csrf_token %}
            <div class="input-group">
                <div class="input-group-prepend">
                <span class="input-group-text"></span>
                </div>
                <input type="text" class="form-control" name="surname">
                <button type="submit" class="btn btn-dark">Search</button>
            </div>


        </form>
    </div>
    </br>

    <div class="container mt-4">
      <h1 class="text-center mb-4">Contact List</h1>
      <div class="row">
        {% for contact in contacts %}
        <div class="col-md-6 col-lg-4">
          <div class="card mb-4">
            <div class="card-body">
              <h5 class="card-title">{{ contact.first_name }} {{ contact.last_name }}</h5>
              <h6 class="card-subtitle mb-2 text-muted"><a href="{% url 'contact-detail' contact.id %}">{{ contact.surname }}</a></h6>
              <p class="card-text">Phone: {{ contact.phone }}</p>
              <p class="card-text">Email: {{ contact.email }}</p>
              <p class="card-text"><small class="text-muted">Added on {{ contact.upload_date|date:"F d, Y" }}</small></p>
            </div>
          </div>
        </div>
        {% endfor %}
      </div>
    </div>
{% endblock content %}
Next, let’s create a delete template. Create a file called contact_delete.html and add the code below.
{% extends 'contact/base.html'%}
{% block content %}
    </br>
    <div style="margin-top: 1%;">
        <form method="POST">
            {% csrf_token %}
            <h3>Are you sure you want to delete the video {{ object.surname }} ?</h3>
            <button type="submit" class="btn btn-primary">Confirm Delete</button>
        </form>
    </div>
{% endblock content %}
Next is the update template where users can update contact details. Create a file called contact_update.html and add the code below.
{% extends 'contact/base.html' %}
{% block content %}
</br>
<div>
    <form method="POST" enctype="multipart/form-data">
        {% csrf_token %}
        <h1>Upload a Contact</h1>
            {{ form.as_p }}
        <button class="btn btn-outline-info" type="submit">Upload</button>

    </form>
</div>
{% endblock content %}
Finally, we need a template to show contacts in detail. Create a file called contact_detail.html and add the code below.
{% extends 'contact/base.html' %}

{% block content %}
<div class="container mt-4">
  <div class="row justify-content-center">
    <div class="col-md-8">
      <div class="card shadow-lg">
        <div class="card-header">
          <h4>{{ contact.first_name }} {{ contact.last_name }}</h4>
        </div>
        <div class="card-body">
          <p class="card-text"><strong>Surname:</strong> {{ contact.surname }}</p>
          <p class="card-text"><strong>Phone:</strong> {{ contact.phone }}</p>
          <p class="card-text"><strong>Email:</strong> {{ contact.email }}</p>
        </div>
        <div class="card-footer text-muted">
          <small class="text-muted">{{ contact.upload_date|date:"F d, Y" }}</small>
        </div>
        <div class="row">
            <div class="col-md-6">
                <a href="{% url 'contact-update' object.id %}" class="btn btn-primary">Update</a>
                <a href="{% url 'contact-delete' object.id %}" class="btn btn-danger">Delete</a>
            </div>
        </div>
      </div>
    </div>
  </div>
</div>
{% endblock content %}
That’s it with the templates now let’s create our database by running the command below on your terminal.
python3 manage.py makemigrations After the command executes successfully run the command below to do the migrations.
python3 manage.py migrateFinally, run the command below which should start the web server and the app should be accessible at this address [http://127.0.0.1:8000]
python3 manage.py runserverYour application should show up there, use the navbar to create a new contact.
There you have it, thanks for reading.


Pingback: How to Build A Language Translator App Using Django - bytexplain