Introduction
A love calculator is a calculator that calculates the compatibility between two individuals based on their names or other personal information. In this tutorial, we will be building a love calculator by implementing an API from RapidAPI. We will then wrap it in a flask application.
Table of Contents
Install modules
In this tutorial, we will be using Flask which will be our web server and requests library which will allow us to make HTTP requests. To install these modules run the commands below.
pip3 install Flask

pip3 install requests
File structure
Let’s first create a folder called love-calculator which will hold our project, Inside the folder create a folder called templates and insert a file called server.html.
Import modules
In this tutorial, we will be using the following API from RapidAPI. [ https://rapidapi.com/ajith/api/love-calculator/ ] . It is a love calculator which you will first need to register in RapidAPI to get the API key.
Inside the love-calculator folder create a file called app.py and import the modules below.
from flask import Flask, request, render_template
import requests
Initialize our application
Let’s now initialize our application.
app = Flask(__name__)Request headers
Now let’s create some headers here. In the x-rapidapi-key replace it with your own API key and make sure to make it private.
url = "https://love-calculator.p.rapidapi.com/getPercentage"

headers = {
	"X-RapidAPI-Key": "YOUR API KEY",
	"X-RapidAPI-Host": "love-calculator.p.rapidapi.com"
}
Create our view
Now let’s create our view below. This view receives a female and male name and queries it to the API where we receive the percentage of the compatibility.
@app.route('/',methods=['GET','POST'])
def index():
	if request.method == "POST":
		sname = request.form['sname']
		fname = request.form['fname']
		querystring = {'sname': sname, 'fname': fname}
		response = requests.request("GET", url, headers=headers, params=querystring).json()
		percentage = response['percentage']
		result = response['result']
		return render_template('server.html',percentage=percentage, result=result)

	return render_template('server.html')


if __name__ == "__main__":
	app.run(debug=True)
Create a template
Now let’s create a template to render our results and also prompt the user. In the server.html template we created above let’s add the following code below.
<!DOCTYPE html>
<html>
<head>
	<title>My Form</title>
	<!-- Include Bootstrap CSS -->
    <link href="https://cdn.jsdelivr.net/npm/bootstrap@5.3.0-alpha3/dist/css/bootstrap.min.css" rel="stylesheet" integrity="sha384-KK94CHFLLe+nY2dmCWGMq91rCGa5gtU4mk92HdvYe+M/SXH301p5ILy+dN9+nJOZ" crossorigin="anonymous">
	<style>
		/* Style to center form horizontally */
		.center-form {
			display: flex;
			justify-content: center;
			align-items: center;
			height: 100vh;
		}
		.title {
			text-align: center;
		}
		.results {
			text-align: center;
		}
	</style>
</head>
<body>
	<div class="center-form">
		<form method="POST" class="col-md-6">
			<h1 class="title">Love Calculator</h1>
			<!-- First Name -->
			<div class="mb-3">
				<label for="fname" class="form-label">Female Name:</label>
				<input type="text" name="fname" id="fname" class="form-control" required placeholder="female name">
			</div>
			<!-- Last Name -->
			<div class="mb-3">
				<label for="sname" class="form-label">Male Name:</label>
				<input type="text" name="sname" id="sname" class="form-control" required placeholder="male name">
			</div>
			<!-- Submit Button -->
			<button type="submit" class="btn btn-primary mb-3">Submit</button>
			<!-- Results -->
			<div class="results">
				<div class="container text-center">
					<p class="font-weight-bold">Result:</p>
					<p>{{ result }}</p>
					<p class="font-weight-bold">Percentage:</p>
					<p>{{ percentage }}%</p>
				</div>
		</form>
	<!-- Include Bootstrap JS -->
	<script src="https://cdn.jsdelivr.net/npm/bootstrap@5.3.0-alpha3/dist/js/bootstrap.bundle.min.js" integrity="sha384-ENjdO4Dr2bkBIFxQpeoTz1HIcje39Wm4jDKdf19U8gI4ddQ3GYNS7NTKfAdVQSZe" crossorigin="anonymous"></script>
</body>
</html>
Run
Now let’s run our application, to do so open your terminal and run the command below
python3 app.pyResults
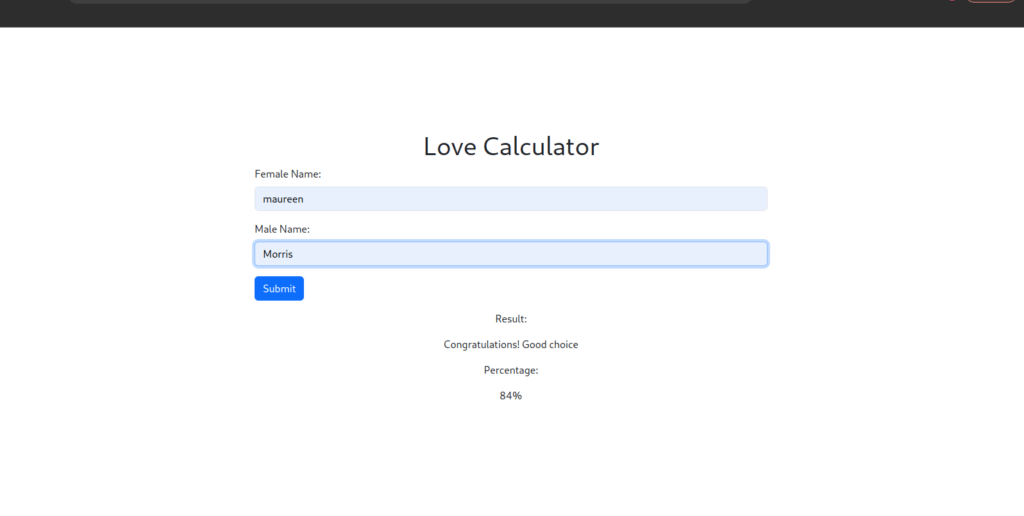
After executing the command above our application should be available at the address [ http://127.0.0.1:5000 ]. Here is our app shown below.

There you have it, Thanks for reading. Happy Coding.


