Introduction
A QR code or rather Quick Response code, is a two-dimensional barcode that can be scanned using a smartphone or a dedicated QR code reader. It is commonly used in marketing and product labeling. In this tutorial, we will create a Django app that requests a URL or a link and turns it into a QR code.
Modules
To begin with this project we first need to install a few libraries one is Django, which will be used to build the basic web server and the next is the qrcode library responsible for generating the QR code. To install the above modules run the commands below on your terminal.
pip3 install django

pip3 install qrcode
After installing the modules above now let’s create our django project. To create the django app run the command below in your terminal.
django-admin startproject django_qrcode
The above command will create a folder called django_qrcode , now cd into the folder and then run the command below.
python3 manage.py startapp qrNow that will create an app called qr. Inside the django_qrcode folder find the settings.py file and add the following to the installed apps list.
INSTALLED_APPS = [
    'django.contrib.admin',
    'django.contrib.auth',
    'django.contrib.contenttypes',
    'django.contrib.sessions',
    'django.contrib.messages',
    'django.contrib.staticfiles',
    'qr',
]
Now add the following routes inside the urls.py file.
from django.contrib import admin
from django.urls import path,include

urlpatterns = [
    path('admin/', admin.site.urls),
    path('',include('qr.urls')),
]
Now we need to create the view for our app. Inside the qr folder add the following in the views.py file.
from django.shortcuts import render
import qrcode
from io import BytesIO
from django.core.files import File
import base64

def index(request):
    url = request.POST.get('url')
    img = qrcode.make(url)
    buffer = BytesIO()
    img.save(buffer)
    buffer.seek(0)
    img_str = base64.b64encode(buffer.read()).decode()
    return render(request, 'qr/index.html', {'img_str': img_str})
The above code takes a URL from a html template and then uses the qrcode module which makes a unique qrcode. The image is then rendered to the frontend in a template called index.html.
Next, we need to create routes for our app, in the qr folder create a files called urls.py. Inside this file add the code below.
from django.urls import path
from . import views

urlpatterns = [
    path('', views.index, name='index'),
]
Now we need to make our templates, inside the qr folder, create a folder called templates and inside the templates folder create a file called index.html. Inside the index.html file add the following.
<!DOCTYPE html>
<html>
<head>
  <title>{% block title %}{% endblock %}</title>
  <meta charset="utf-8">
  <meta name="viewport" content="width=device-width, initial-scale=1">
  <link rel="stylesheet" href="https://stackpath.bootstrapcdn.com/bootstrap/4.3.1/css/bootstrap.min.css">
  <script src="https://code.jquery.com/jquery-3.3.1.slim.min.js"></script>
  <script src="https://cdnjs.cloudflare.com/ajax/libs/popper.js/1.14.7/umd/popper.min.js"></script>
  <script src="https://stackpath.bootstrapcdn.com/bootstrap/4.3.1/js/bootstrap.min.js"></script>
</head>
<body>
    <div class="container">
        <h1>Generate QR Code</h1>
        <form method="post">
          {% csrf_token %}
          <div class="form-group">
            <label for="url">Enter Your Url</label>
            <input type="text" class="form-control" id="url" name="url" placeholder="Enter URL here ">
          </div>
          <button type="submit" class="btn btn-primary">Generate</button>
        </form>
        {% if img_str %}
          <img src="data:image/png;base64,{{ img_str }}" alt="QR Code">
        {% endif %}
      </div>
</body>
</html>
The above code takes a URL and is submitted to the backend and then the image produced is rendered.
Now we have finished, to run the project open the terminal and run the code below.
python3 manage.py runserverThe command above will fire up the server and now you can access the app using the URL below.
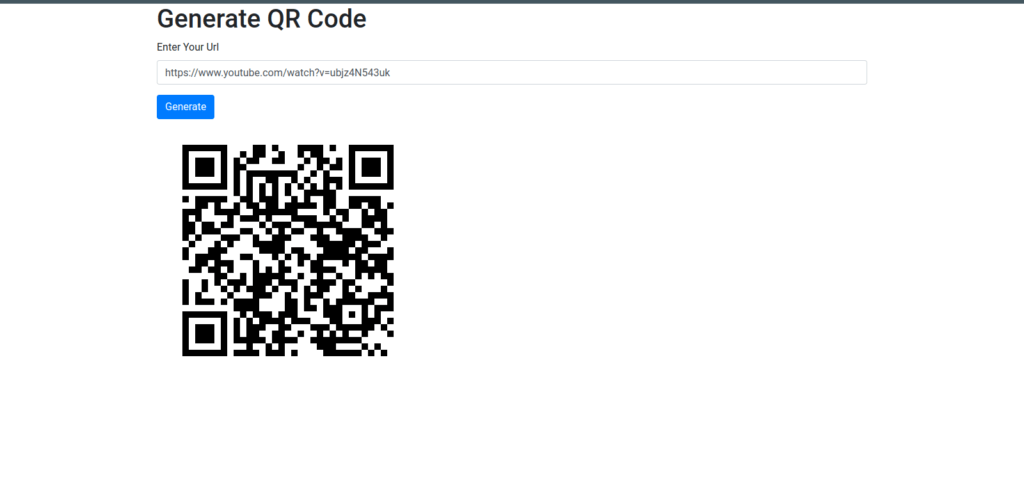
http://127.0.0.1:8000Open the browser and enter the address above and here are the results below.

There you have it, play around with the app and generate QR codes. Thanks for reading.


