Introduction
In this tutorial, we will be building an age calculator using Django. Django will be our primary web server. To begin we will first need to install Django. To do so run the commands below in your terminal.
Table of Contents
Project setup
pip3 install DjangoAfter installing Django, run the commands below to create our Django application.
django-admin startproject ageappAfter the command executes successfully we a folder called ageapp will be created, cd into the directory, and then run the command below to create our app.
python3 manage.py startapp age SEE ALSO: How to build a qrcode generator using Django
App configuration
Now let’s add our application to our project, to do so add the following in the settings.py file
INSTALLED_APPS = [
    'django.contrib.admin',
    'django.contrib.auth',
    'django.contrib.contenttypes',
    'django.contrib.sessions',
    'django.contrib.messages',
    'django.contrib.staticfiles',
    'age',
]
Create calculator view
Now let’s go to our age app folder and inside the views.py file let’s create a simple view as shown below.
from django.shortcuts import render
from datetime import date, datetime

def calculate(request):
    if request.method == 'POST':
        date_of_birth_str = request.POST['date_of_birth']
        date_of_birth = datetime.strptime(date_of_birth_str, '%Y-%m-%d').date()
        today = date.today()
        age = today.year - date_of_birth.year - ((today.month, today.day) < (date_of_birth.month, date_of_birth.day))
        print(age)
        return render(request, 'age/index.html', {'age': age})
    else:
        return render(request, 'age/index.html')
The above function takes a date of birth from the user and then the age is calculated from the current date and then rendered to the user.
Create a template
Inside the age folder create a folder called templates and inside it create a folder called age finally create a file called index.html
[ age/templates/age/index.html ]. Now inside the index.html file insert the code below.
PE html>
<html>
<head>
    <title>Age Calculator</title>
    <style>
        body {
            display: flex;
            justify-content: center;
            align-items: center;
            height: 100vh;
            font-family: Arial, sans-serif;
        }

        .container {
            text-align: center;
            padding: 70px;
            border: 1px solid #ccc;
            border-radius: 5px;
            background-color: #f9f9f9;
        }

        h1 {
            margin-bottom: 20px;
        }

        .form-group {
            margin-bottom: 10px;
        }

        .form-group label {
            display: block;
        }

        .form-group input {
            width: 100%;
            padding: 10px;
            border: 1px solid #ccc;
            border-radius: 3px;
        }

        .form-group button {
            padding: 10px 20px;
            background-color: #4caf50;
            color: #fff;
            border: none;
            border-radius: 3px;
            cursor: pointer;
        }

        .result {
            margin-top: 20px;
            font-size: 20px;
        }
    </style>
</head>
<body>
    <div class="container">
        <h1>Age Calculator</h1>
        <form method="POST">
            {% csrf_token %}
            <div class="form-group">
                <label for="date_of_birth">Date of Birth:</label>
                <input type="date" name="date_of_birth" id="date_of_birth" required>
            </div>
            <div class="form-group">
                <button type="submit">Calculate</button>
            </div>
        </form>
        {% if age %}
        <div class="result">
            Age: {{ age }}
        </div>
        {% endif %}
    </div>
</body>
</html>
Create app routes
Inside the age folder create a file called urls.py and insert the code below.
from django.urls import path
from . import views

urlpatterns = [
    path('',views.calculate, name="calculate"),
]
The above code maps our function view to a route that we can navigate.
Create project routes
Finally, we need to map our application views to the main project, to do so insert the code below in the urls.py inside the ageapp folder.
from django.contrib import admin
from django.urls import path,include

urlpatterns = [
    path('admin/', admin.site.urls),
    path('',include('age.urls')),
]
Run
To run our project open your terminal and execute the command below.
python3 manage.py runserverResults
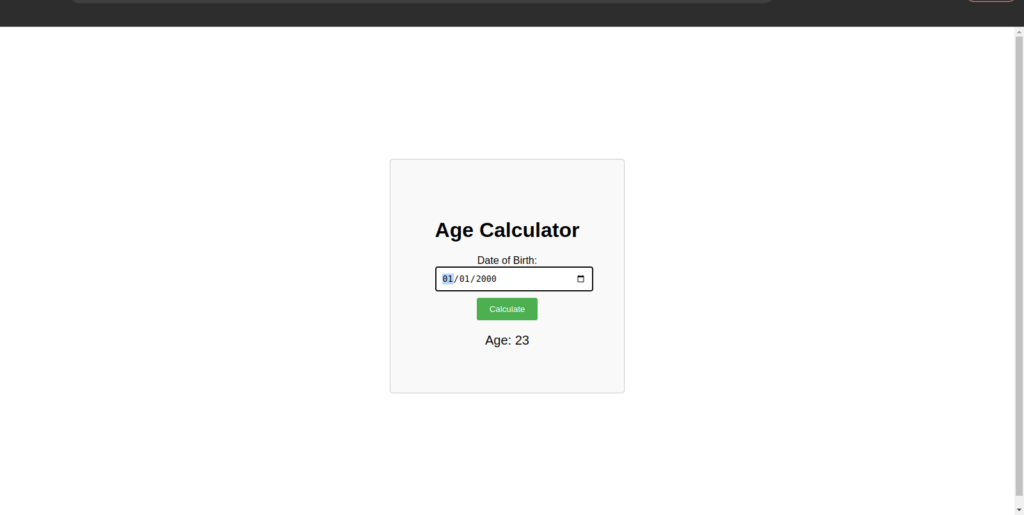
After executing the command above our application should be available at the address [ http://127.0.0.1:8000 ].
Here is a screenshot of the finished application.

There you have it, Thanks for reading. Happy Coding


