Introduction
In Flask, messages are notifications that can be displayed to the user to provide information about the success or failure of an operation and also provide helpful explanations. In this tutorial, we will be looking at how to implement messages in Flask.
Table of Contents
Import modules
To begin we first need to install Flask in our computer, to do so run the command below.
pip3 install FlaskFile structure
After installing Flask, let’s create a folder called messages, inside the folder create a folder called templates and insert a file called home.html.
Import modules
Inside the messages folder create a file called app.py and import the following libraries as shown below.
from flask import Flask, render_template, request
from flask import flash
Initialize the app
Next, we need to initialize our flask app, to do so add the code below.
app = Flask(__name__)
app.secret_key = b'flaskmesseages101'
Messages view
Now let’s create our view which will ask for a name from the frontend and then flash the messages back to the template. Here is the code below.
@app.route('/', methods=['POST','GET'])
def index():
    if request.method == "POST":
        name = request.form['name']
        flash(f'Hello World, {name}!', 'success')
        return render_template('home.html')
    else:
        return render_template('home.html')


if __name__ == "__main__":
    app.run(debug=True)
Create template
Inside the home.html template we create above let’s add the code below.
<!DOCTYPE html>
<html lang="en">
  <head>
    <meta charset="UTF-8">
    <meta name="viewport" content="width=device-width, initial-scale=1.0">
    <meta http-equiv="X-UA-Compatible" content="ie=edge">
    <title>My Website</title>
    <link rel="stylesheet" href="https://stackpath.bootstrapcdn.com/bootstrap/4.5.0/css/bootstrap.min.css" integrity="sha384-9aIt2nRpC12Uk9gS9baDl411NQApFmC26EwAOH8WgZl5MYYxFfc+NcPb1dKGj7Sk" crossorigin="anonymous">
    <link rel="icon" href="./favicon.ico" type="image/x-icon">
    <style>
        .message {
            text-align: center;
        }
    </style>
  </head>
  <body>
      {% with messages = get_flashed_messages() %}
        {% if messages %}
          <div class="alert alert-success message" role="alert">
            {% for message in messages %}
              {{ message }}
            {% endfor %}
          </div>
        {% endif %}
      {% endwith %}
    <main class="d-flex justify-content-center align-items-center">
      <div class="container">
        <div class="row">
          <div class="col-12">
            <form method="POST" class="text-center">
              <div class="form-group">
                <label for="name">Name :</label>
                <input type="text" name="name" id="name" class="form-control">
              </div>
              <input type="submit" class="btn btn-primary">
            </form>
          </div>
        </div>
     </div>
</main>
<script src="https://code.jquery.com/jquery-3.5.1.slim.min.js" integrity="sha384-DfXdz2htPH0lsSSs5nCTpuj/zy4C+OGpamoFVy38MVBnE+IbbVYUew+OrCXaRkfj" crossorigin="anonymous"></script>
<script src="https://cdn.jsdelivr.net/npm/popper.js@1.16.0/dist/umd/popper.min.js" integrity="sha384-Q6E9RHvbIyZFJoft+2mJbHaEWldlvI9IOYy5n3zV9zzTtmI3UksdQRVvoxMfooAo" crossorigin="anonymous"></script>
<script src="https://stackpath.bootstrapcdn.com/bootstrap/4.5.0/js/bootstrap.min.js" integrity="sha384-OgVRvuATP1z7JjHLkuOU7Xw704+h835Lr+6QL9UvYjZE3Ipu6Tp75j7Bh/kR0JKI" crossorigin="anonymous"></script>
</body>
</html>
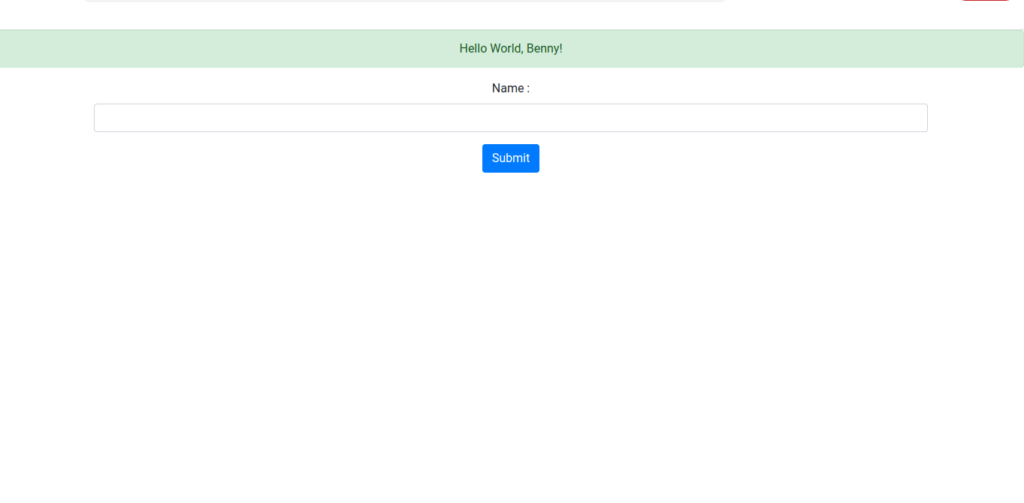
The above template asks the user for his name and then the name is flashed using a success notification as indicated in the flask code.
Run
Now open your terminal and run the code as shown below.
python3 app.pyResults
After the command executes the server should be up and running and available at the address [ http://127.0.0.1:5000 ]. Here is our app as shown below.

There you have it, that’s how you implement messages in Flask. Happy Coding.


